The T-55 Enigma by Iwan Hughes
Iwan Hughes @hughesy_models has built an adaptation of the classic T-55 Main Battle Tank -The Iraqi T-55 “Enigma”, known locally as the “Al-Faw”.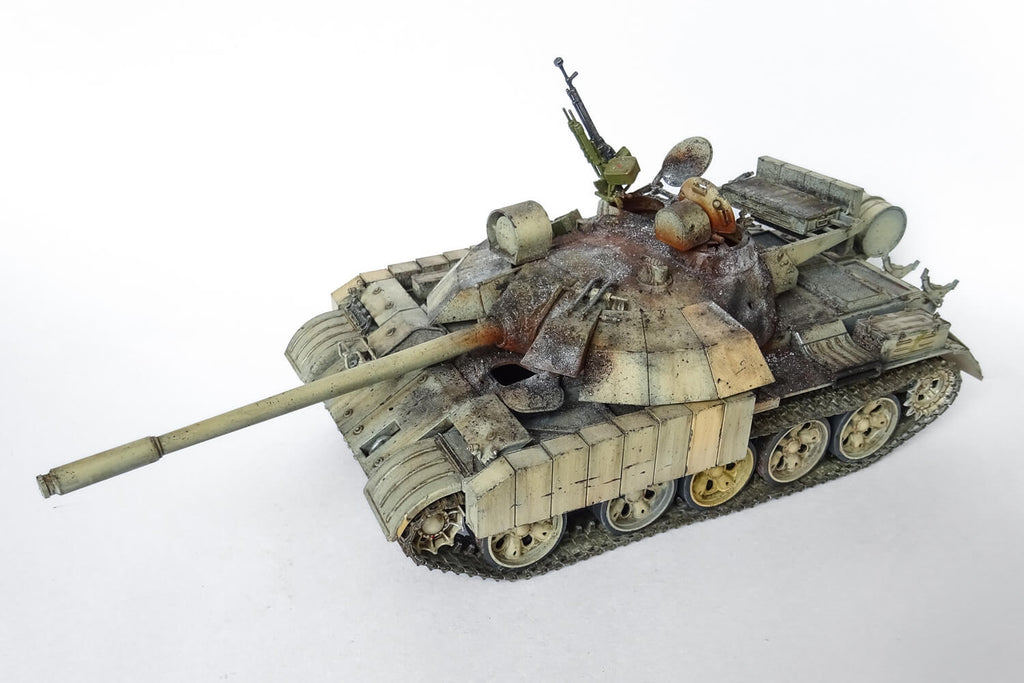
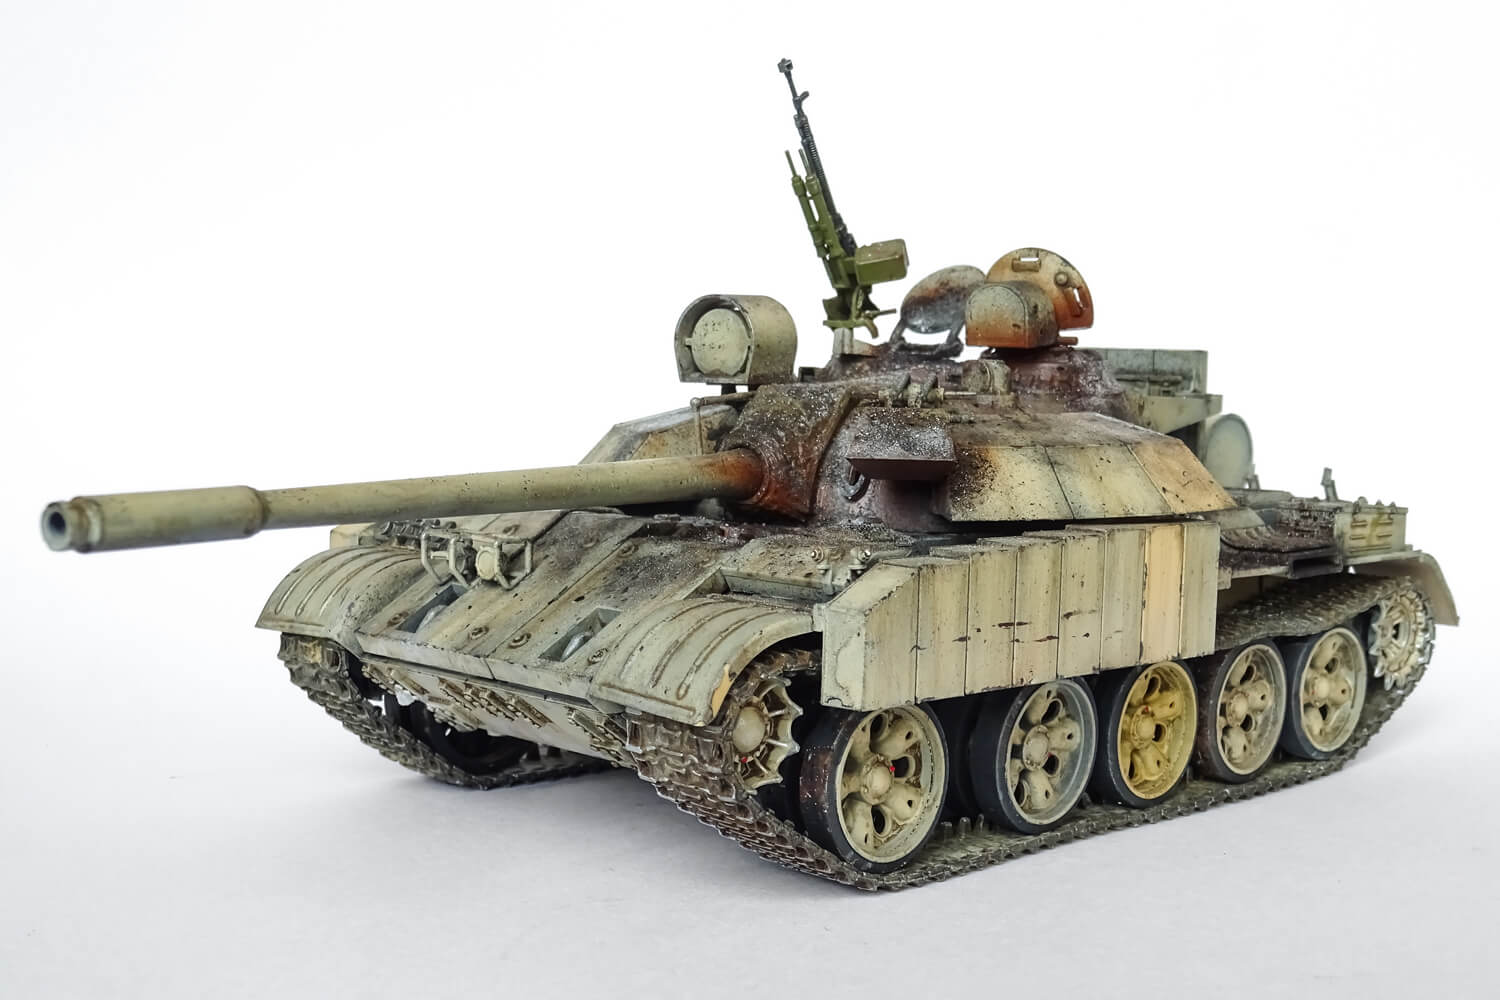
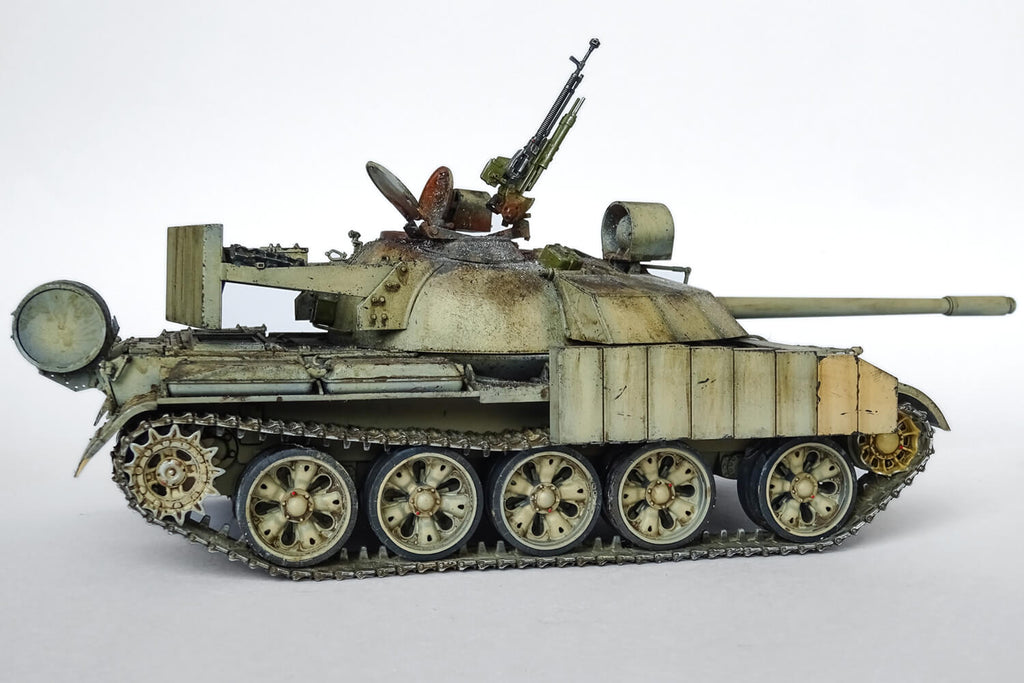
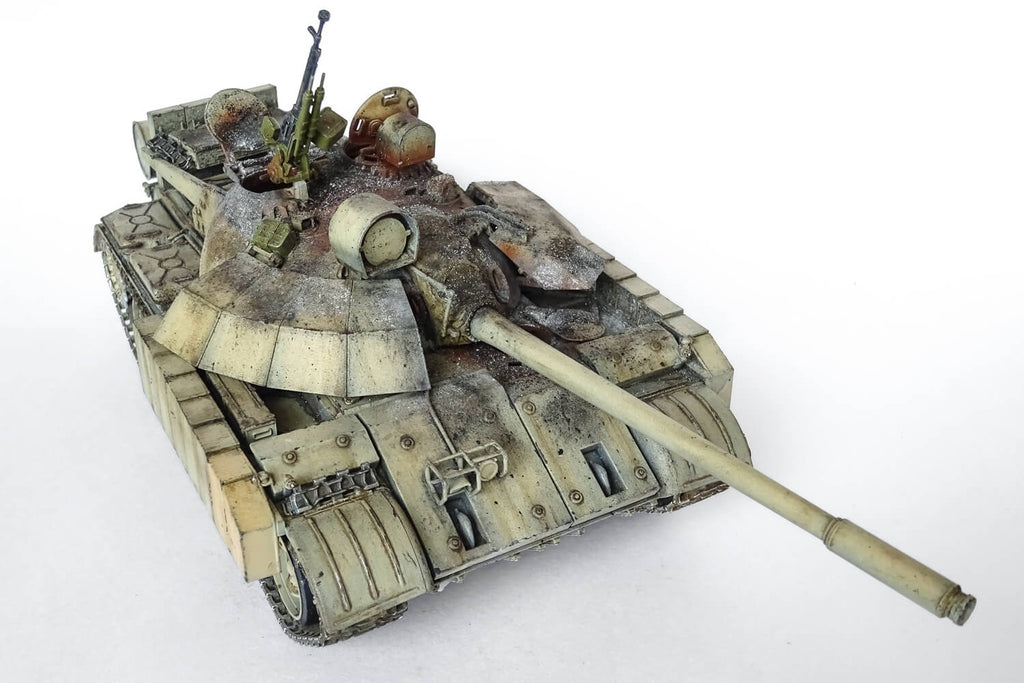
This vehicle was developed in the late 80s around the time of the Iran-Iraq war. It is in essence an up-armoured T-55 with large armour blocks added to the front of the turret, and glacis plate & front sides added to the hull. The armour was made up of sheets of steel and rubber, believed to have been created to counter the threat from HEAT (High Explosive Anti-Tank) shells and ATGMs (Anti-Tank Guided Missiles).
The Iran-Iraq War had devastated the Iraqi economy, and almost exhausted Iraqi military production capacity, with the exception of low-quality local production workshops. The 1990 invasion of Kuwait also prompted the adoption of United Nations Security Resolution 661, which meant that no modern arms could be bought from abroad. In this context, the T-55 Enigma was quite an ingenious solution to the conundrum.
The first encounter of a T-55 Enigma was made during the Battle of Kajif (29th January - 2nd February 1991), and despite accounts recorded stating that the crude armour was in part effective against ATGMs, the vehicle was no match to its modern coalition counterparts, such as the AMX-30 and an AC-130 ‘Spectre’ Gunship circling above.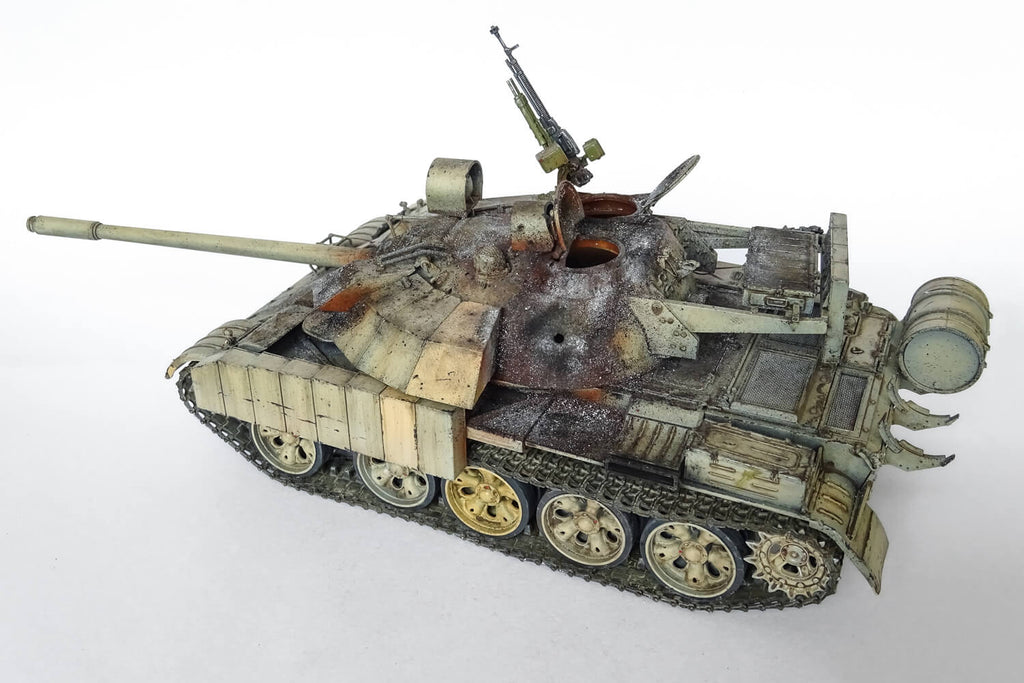
For this build I used the 1/35 scale Tamiya Iraqi Tank T-55 ‘Enigma’ (kit number 35324). The kit is a highly detailed product with moulded sprues. The detail of the vehicle is outstanding with weld seams on the armour blocks and a cast appearance to the turret surface.
The hulls upper deck has moulded braces for the additional armour and the hull bottom has crude but satisfactory axle channels set in to the kit. The tracks are the ‘rubber band’ type; and in hindsight, I should have bought an aftermarket set as the kit ones do not sit very well.
A detail that was disappointingly missing from this kit are the fuel lines which connect the fuel cells to each other and to the tank. I overcame this by constructing the fuel lines from 20 gauge beading wire.
The kit does not come with a decal sheet as the ‘real-life’ ‘Enigmas’ had no unit marks or identification.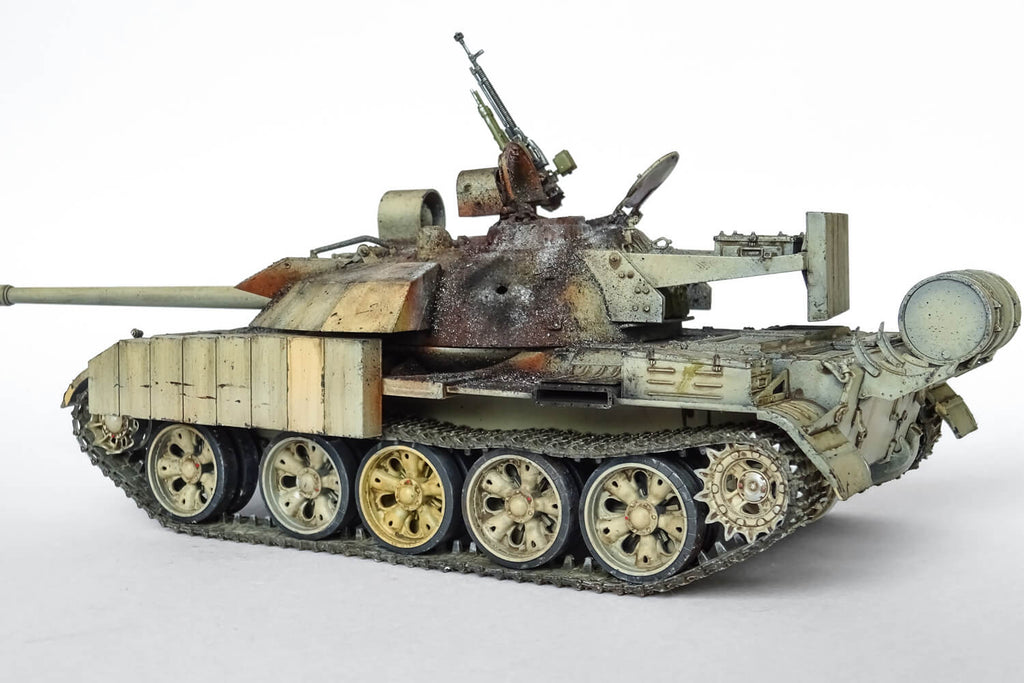
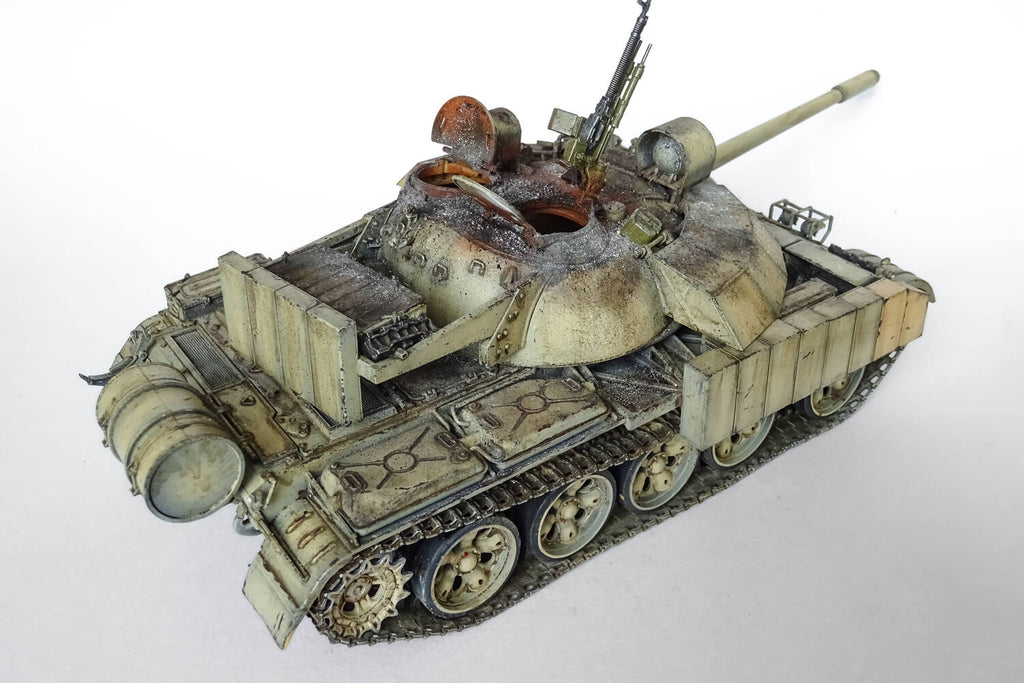
One of the main ironies I found with this vehicle when I was researching it was that the developers and builders had tried so hard to up-armour their project to face up to what was a far superior coalition force; however, they had left gaping holes in the additional armour which left the vehicle, from some angles, completely vulnerable.
I decided to depict my vehicle as being a destroyed “Enigma” having taken a round through the ‘un-armoured’ rear quarter of the turret. To do this, I studied the appearance of shells and missile strikes to armour. I also wanted to give the appearance of an ‘Ammo Cookoff’ with extreme burning around the hatches and roof of the turret.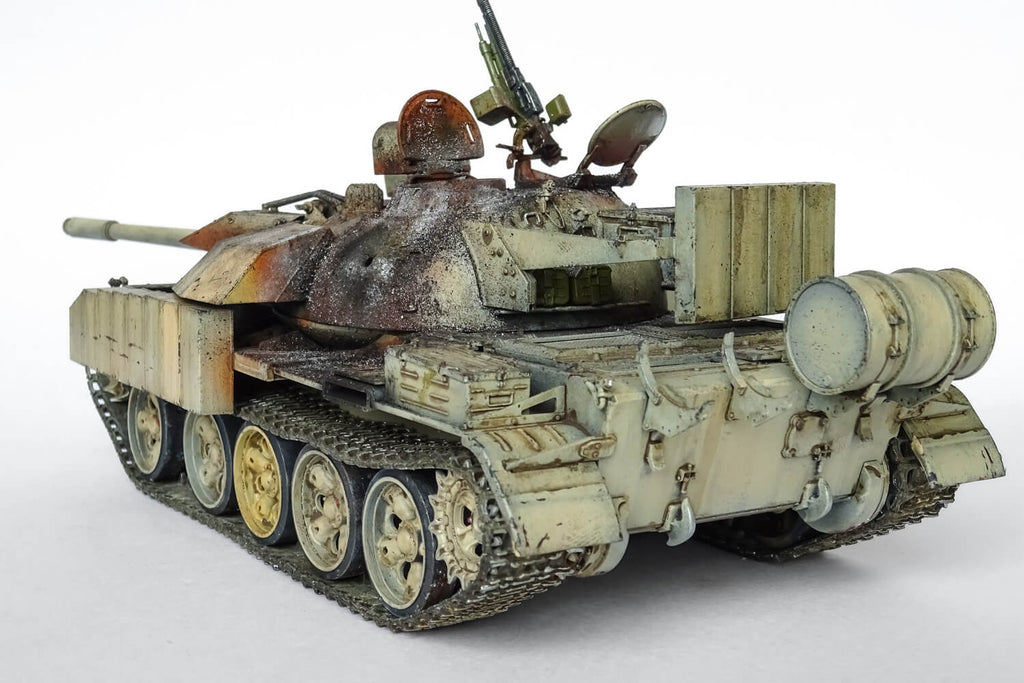
The construction of this kit is classic Tamiya; very straight forward with all of the pieces going together perfectly. I did not need to use any filler for gaps on this build! As with most of my projects, I completed the construction completely before the painting stage.
For the damage I wanted to show on this vehicle, I selected an area on the rear quarter of the turret and pierced it with a heated sanding file, making a hole approximately 2mm in diameter to keep it in scale. For the explosive damage and shrapnel, I heated the end of a safety-pin and pressed it into the turret lengthways; this made a perfectly straight score in the plastic which faded as it went outwards from the impact spot. I used this method to scar the area around the hole and also where I felt shrapnel may strike in the vicinity.
I used the 20 gauge beading wire to add some cables to the headlight cluster and thinner copper wire for the smaller manoeuvring lights around the vehicle.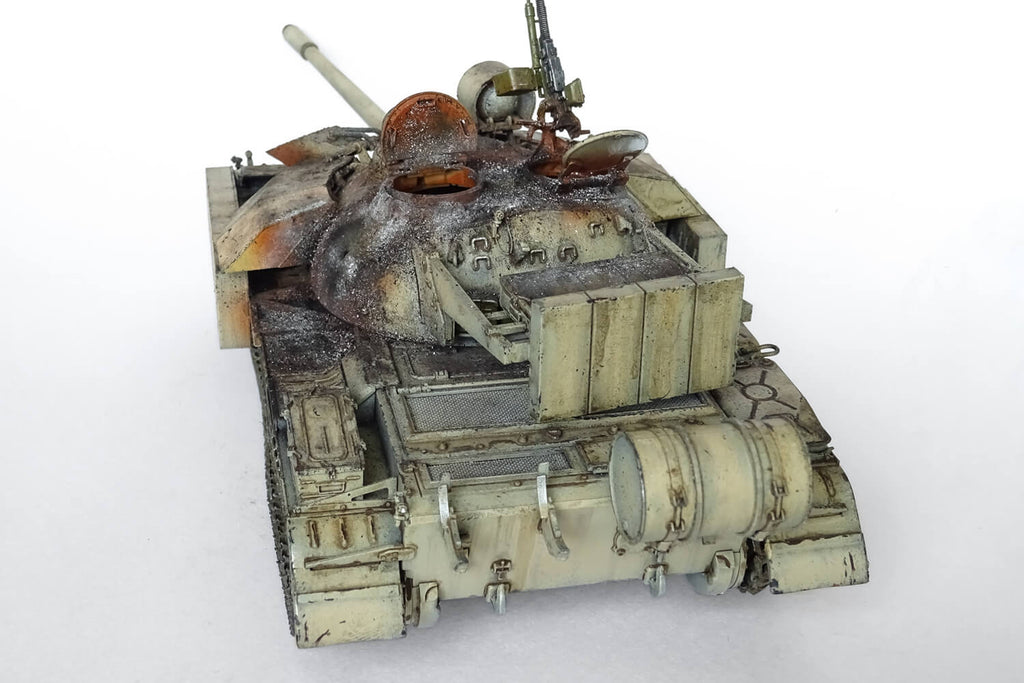
Once the build was complete, I began the painting process. I painted the whole kit with a coat of black Vallejo surface primer (73.602). As this vehicle is finished in a single light tone, I decided to use the ‘Black & White’ technique’ of painting which would emphasise depth and shadows. I used AK Interactive ‘Light Grey’ (AK784) to highlight the upper panels, large open panels and also the centre portions of the applique armour.
I used AK Interactive ‘New Iraqui Army Sand' (AK725) for the colour of the vehicle. I applied this using an airbrush in several very thin coats; this was to allow the shading and highlights from the primer coat to show through. To illustrate the modular style of the additional armour on this vehicle, I decided to paint some of the blocks a slightly different colour to the main vehicle. I carefully masked off some of the blocks and painted them with AK Interactive ‘British Sand Yellow’ (AK726). I also painted one wheel and idler the same colour.
As this vehicle was very ‘non-descript’ in terms of a paint job; I gave the kit a coat of Vallejo Matt Varnish (70.520) before moving onto the weathering.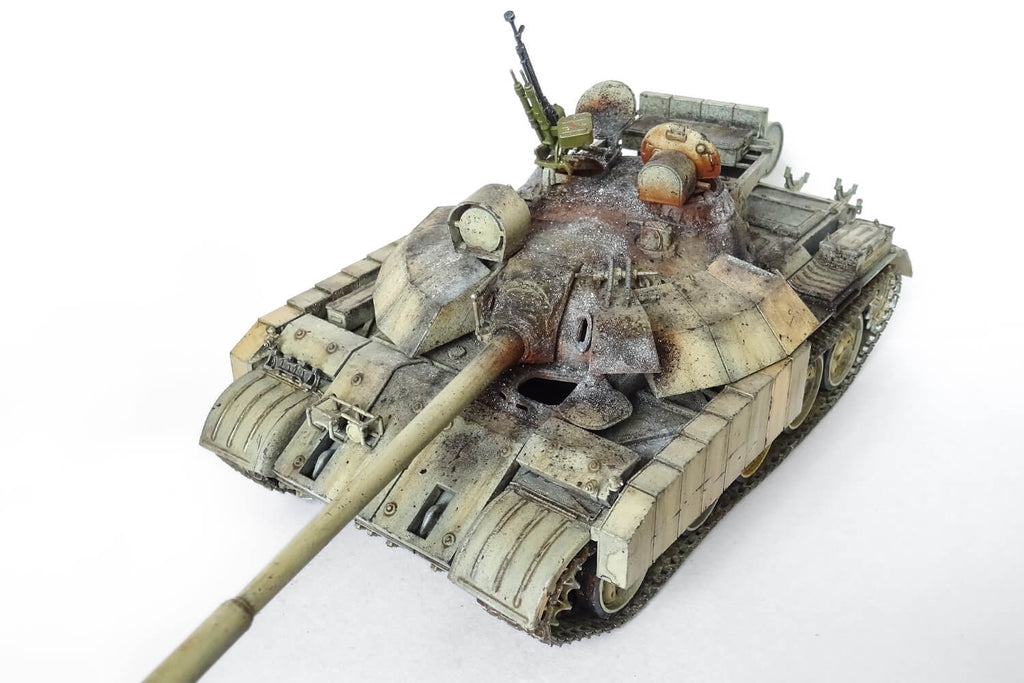
I gave the whole vehicle a coat of AK interactive Dark Yellow Wash (AK300) thinned with white spirit. This achieved the effect of dulling down all of the colours and gave a ‘dusty’ look whilst also emphasising edges and corners. Once this was dry, I applied a pin-wash to all of the details with AK Interactive ‘Streaking Grime’ (AK012).
I used a small sponge and fine brush to create a chipped and scratched appearance to the edges and flat surface of the vehicle using Vallejo ‘Black Grey’ (70.862).
I painted the tracks using AK interactive ‘Dark Tracks’ (AK722). I then dry brushed the edges and teeth of the tracks, the DShKM and some of the vehicle edges and panels where I would expect ware with AK Interactive ‘True Metal, Steel’ (AK457). As this vehicle was used in hot and sandy areas; I believe the sand abrasion would give metal a brushed appearance.
Next, I needed to recreate the appearance of extreme burning seen when ammo ‘cooks-off’ in a tank. This produces jets of fire tearing out of open hatches and cavities. Using my Chiminea in the back garden for reference, I applied a coat of Ammo Mig Red ‘Red Primer Light Base’ (A.MIG-921) around the hatches an on the roof of the turret. I then used ‘RAL 8012 Rotbraun' (A.MIG-014) to highlight some of these areas to add contrast.
To complete the burnt appearance, I used AK Interactive Burnt Vehicles Weathering set. Firstly, I brushed on thin coat of the Pigment Fixer fluid onto the areas I wanted to cover. I then used a broad head dry brush to dust the binder with pigments. The first coat around the extremities of the burning was covered with ‘Burnt Umber’, then working inwards towards the hatches, I applied ‘Black’ fading between both colours. Once the binder had dried, I dusted ‘White Ashes' over the whole area and a very sparse dusting of ‘Burnt Rust Red’.
Whilst applying the pigment, I found that some accidentally flicked over other parts of the vehicle. I removed most of it not to go ‘over the top’ with the pigment, however I did leave some parts as I'm sure burning such as this would have made quite a mess!
To finish the kit, I applied a mixture of earth tone pigments onto the tracks to replicate sand and dust gathering.
I would like to thank Panzermodels.co.uk for their support in this build!

2 Responses

Jef
Exellent modeling doubtful my efforts would make that grade but it’s fun trying.

Mike jarman
Just like to say way cool job on the 55 maybe some day I will be this good. But I’m working on it. I got several mods to practice on lol. But I will be watching for the panzer 2000 because I got one myself it’s a cool build btw. So I’m sure it’s going to look good. Can’t wait to c it. Best of luck. Mike
Leave a comment
Comments will be approved before showing up.
Also in News, reviews and guides for 1/35 scale modelling

© 2026 Panzer Models. Prepared by Article.
Panzer Models
Author